Purchase requisition from a local supplier
The most common requisition: you buy an item from a supplier in Israel, based on a quote you received. At the end the requisition goes for approval, and once approved the buyer turns it into a purchase order to the supplier.
Is there a price list for the item? Use Ordering from a price list (Hebrew). Need something from the warehouse? See Ordering from the central warehouse (Hebrew).
Open a new requisition line
Log in to Anant and in the menu choose רכש (Procurement) → דרישות רכש (Purchase requisitions).
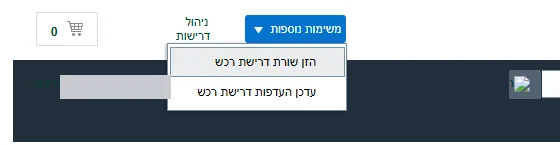
Click משימות נוספות (More tasks) and choose הזן שורת דרישת רכש (Enter requisition line). An empty form for one item opens.
Fill in the item details
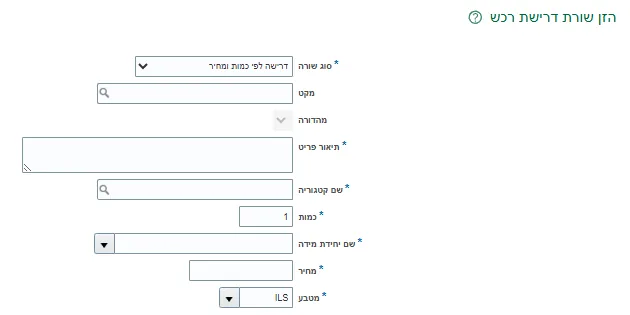
In the top part of the form, fill in what you are buying — according to the quote:
- סוג שורה (Line type) — leave דרישה לפי כמות ומחיר (Goods billed by quantity and price). Don't change it.
- פריט (Item) — leave it empty. In a local purchase you don't have to pick an item from the catalog.
- תיאור פריט (Item description) — what you are buying, in your own words.
- שם קטגוריה (Category name) — choose a suitable category from the list (magnifying glass).
- כמות (Quantity) and שם יחידת מידה (UOM name) — as they appear in the quote.
- מחיר (Price) — the price for one unit, not the total.
- מטבע (Currency) — usually ILS. If the quote is in another currency, choose it.
On the other side of the form you can choose a ספק (Supplier) from the list. It's optional — if you don't, the buyer will choose the supplier when creating the order.
Price per unit — A common mistake: typing the total amount in the מחיר field. The system multiplies the price by the quantity on its own.Fill in the delivery details
Scroll to the מסירה (Delivery) section:
- מבקש (Requester) — your name appears. If you are filling it in for someone else, search for them and select them.
- סוג מיקום יעד למסירה (Deliver-to location type) — פנימי (Internal) for an address from the university list, or חד פעמי (One-time) for a place not on the list (then type it in).
- מיקום יעד למסירה (Deliver-to location) — where the supplier should bring the goods (building, floor, room).
- האם הרכישה מוגדרת כתשומת מחקר או הוראה? (Is this a research or teaching input?) — usually לא תשומה (Not an input). Choose תשומה (Input) only if the purchase is part of research or teaching.
- ערך תכונה (Attribute value) — choose אחר (Other).
 What is an "input"? — Choosing תשומה skips the check of whether a tender is required under the Mandatory Tenders Law. If you choose it, you need to read the contracting procedure and sign the declaration at the link below the field.
Choose a budget line
In the חיוב (Billing) section, the חשבון לחיוב (Charge account) field shows the budget line set as your default. If that's the right one — nothing to do here.
To charge a different budget line:
- Click the blue magnifying glass icon next to the חשבון לחיוב field.
- In the window that opens click איפוס (Reset), and in the message that appears click כן (Yes).
- Click חפש (Search) — the budget lines you are allowed to charge appear.
- Select the right one and click אוקיי (OK).
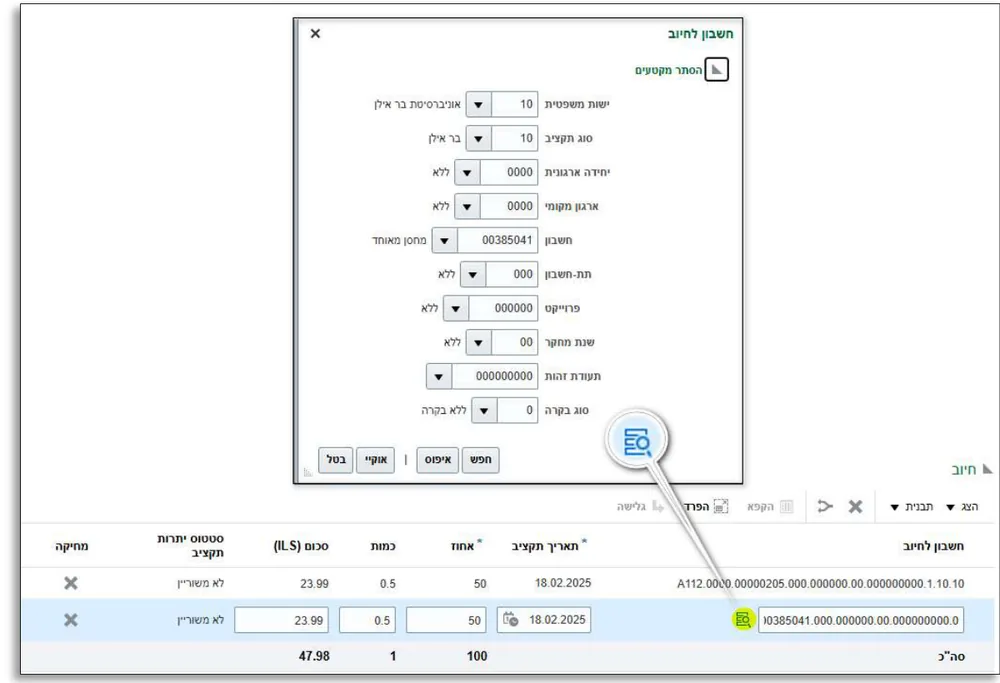 Split between several budget lines — You can charge several budget lines on the same line: click the פיצול (Split) icon to the left of the account row, choose a budget line for the new row, and enter a אחוז (Percent), כמות (Quantity) or סכום (Amount) for each. The total must come to 100% — exactly the line amount.
Add to cart
At the bottom of the form there are הערה לקניין (Note to buyer), הערה לספק (Note to supplier) and הערה למקבל (Note to receiver) fields. Optional — but this is the place for anything they should know.
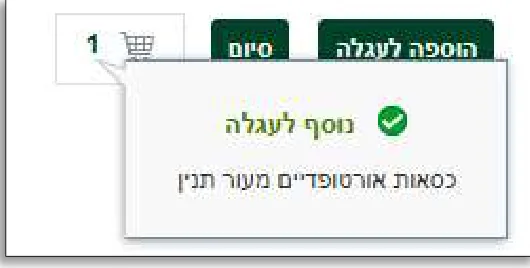
Click הוספה לעגלה (Add to cart) at the top of the form. A small message confirms the item was added.
More items from the same quote? Repeat steps 2–5 for each item. They all go into the same requisition.
Don't click "סיום" — The סיום (Done) button next to הוספה לעגלה closes the form and discards what you filled in.Open the cart and click "בדיקה"
Click the shopping cart icon (the number next to it is the number of items). To remove an item from the cart, click the X next to it.
Click בדיקה (Review). The עריכת דרישת רכש (Edit requisition) screen opens with all the items in the cart.
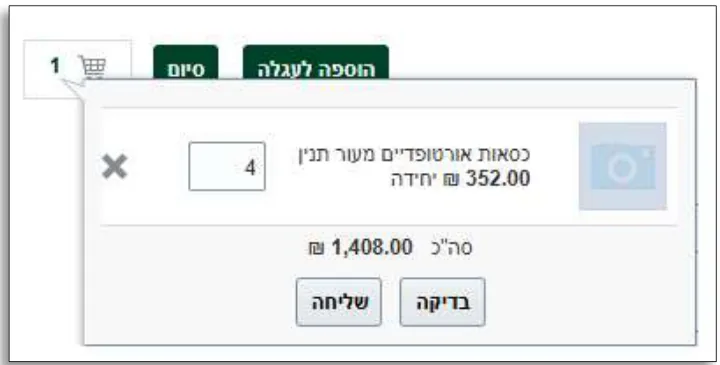 Review, not submit — If you click שליחה (Submit) you'll get an error, because a phone number is still missing. Always click בדיקה.
Complete the requisition details
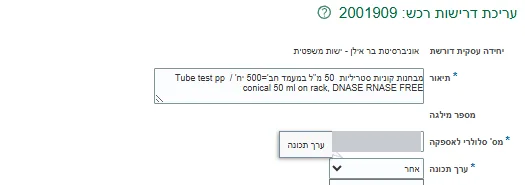
At the top of the עריכת דרישת רכש screen, fill in three fields:
- תיאור (Description) — filled in from the first item. You can change it to a general description of the whole requisition.
- מס' סלולרי לאספקה (Mobile number for delivery) — required. The phone of whoever will receive the goods.
- ערך תכונה — choose אחר.
Want to fix something in an item? Select it in the שורות דרישה (Requisition lines) table, and its details appear below the table.
Attach the quote
In a local purchase you must attach the supplier's quote.
- Click the + next to נספחים (Attachments). The מסמכים מצורפים (Attachments) window opens.
- In the סוג (Type) column choose קובץ (File).
- In the קטגוריה (Category) column choose who the file is for (for example למאשר (To approver)).
- Click Choose File and pick the file from your computer.
- Optionally add a כותרת (Title) and תיאור (Description), then click אישור (OK).
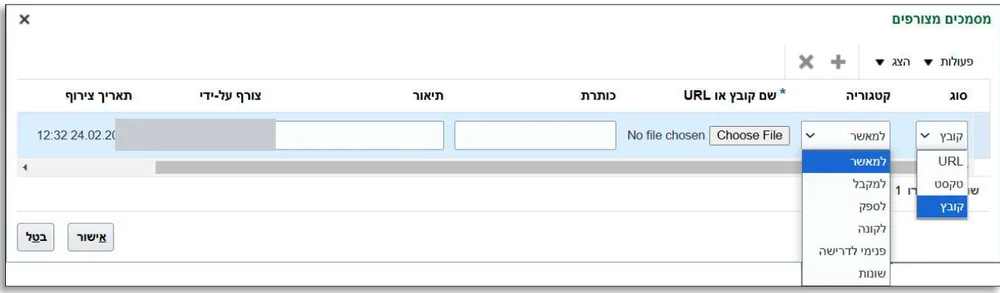
Need to attach another file (for example a technical spec)? Click the + in the window again.
No quote — the requisition is rejected — A local purchase requisition without an attached quote will be rejected during approval.Submit for approval
Click שלח (Submit) at the top of the screen. If everything is OK, a message confirms the requisition was submitted, with the requisition number. Click אוקיי.
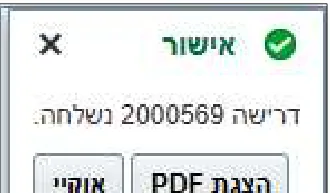
Write down the requisition number. Its status is now ממתין לאישור (Pending approval).
Wait for approval and the order
The requisition goes through several approvers in order — for example the budget manager, and sometimes others such as the research liaison. After the last one approves, the status changes to מאושר (Approved) and the requisition reaches the buyer.
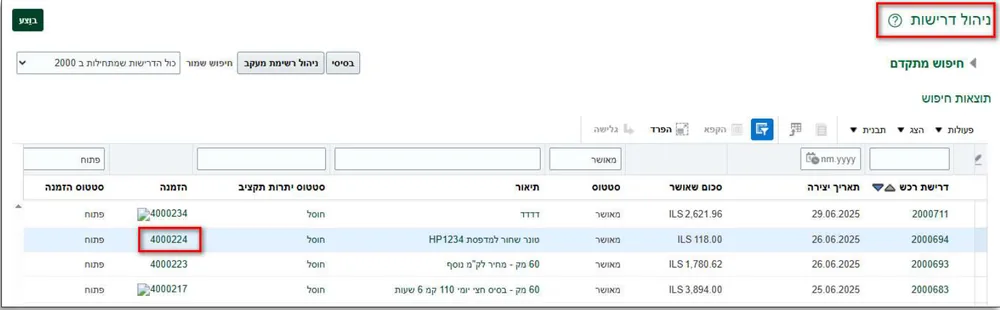
The buyer turns the requisition into a purchase order and sends it to the supplier. The order number appears in the הזמנה (Order) column on the ניהול דרישות (Manage requisitions) screen.
When the goods arrive, confirm receipt in Anant — see Confirming receipt.
Where is my requisition? — How to check who it's waiting with, and how to edit or cancel it — in Tracking a requisition.
Updated September 2026